

Installing an infant car seat base in a U.S. vehicle starts with three things: the correct seating position, the right attachment method, and a snug fit. Place the base rear-facing, follow the car seat and vehicle manuals, and check that the base moves no more than 1 inch from side to side or front to back at the belt path.
A loose base, wrong recline angle, or incorrect belt route can reduce protection in a crash. Set aside enough time to read both manuals before your baby’s first ride. U.S. guidance from the National Highway Traffic Safety Administration (NHTSA) and the American Academy of Pediatrics supports rear-facing travel for infants and careful use of the seat according to its limits.

Before You Install the Infant Car Seat Base
Gather the infant car seat, its base, your vehicle owner’s manual, and the car seat manual. Do not rely on memory or a general video alone. Base designs, belt paths, recline systems, and lower-anchor limits differ by model.
Park on level ground if possible. Turn off the vehicle and remove bulky items from the seat. You should be able to see the base, reach the belt path, and apply firm pressure without twisting the base.
Choose the correct vehicle seating position
The back seat is usually the safest place for a child passenger. Never place a rear-facing infant seat in front of an active passenger air bag. A front air bag can cause severe injury or death to a rear-facing child.
Check your vehicle manual for:
- Approved seating positions
- Lower-anchor locations
- Whether the center seat has lower anchors
- Rules for using a seat belt in the center
- Seat belt locking features
- Restrictions for a seat with a support leg or anti-rebound feature
The center of the back seat is not automatically the best position. Use it only if both the vehicle and car seat manuals allow a secure installation there. A good installation on either side is safer than a poor installation in the center.
Check the base and car seat
Before installation, confirm that:
- The base matches the infant car seat model.
- The base is made for use in the United States.
- No part is cracked, bent, loose, or missing.
- The label has not expired, been recalled, or been damaged.
- The car seat has not been in a moderate or severe crash.
- The base has all required inserts, covers, and adjustment parts.
- The infant seat clicks into the base and releases as the manual shows.
Check for recalls through NHTSA’s recall lookup tool. Also check the manufacturer’s instructions. Do not use a secondhand seat if you cannot verify its history, age, condition, and recall status.
Decide Between Lower Anchors and the Vehicle Seat Belt
Most infant car seat bases can attach with either the vehicle seat belt or the lower anchors. Choose one method unless the car seat manual clearly allows both. Using both does not automatically make the installation safer and may be prohibited by the manufacturer.
Lower anchors
Lower anchors are small metal bars found in the gap between the vehicle seat back and cushion. They are part of the vehicle’s child restraint anchorage system, often called LATCH in the United States.
To use lower anchors:
- Find the lower anchors in the vehicle seat.
- Pull the base’s lower-anchor connectors from their storage area.
- Route the connectors through the correct belt path.
- Press each connector onto the matching anchor.
- Confirm that each connector is fully attached.
- Tighten the strap while keeping it flat.
Some connectors have a visible indicator that changes color when attached correctly. Use the indicator only as the manual describes. It is not a substitute for checking the whole base.
Lower anchors have weight limits. The limit may apply to the combined weight of the child and car seat, and it may vary by vehicle, car seat, or model year. Read the labels and manuals. When your child or seat reaches the stated limit, install the base with the vehicle seat belt instead.
The vehicle seat belt
A vehicle seat belt can provide a safe installation when routed and locked correctly. Use the belt path marked for the base, not a nearby slot that looks convenient.
Most bases use one of these systems:
- A vehicle belt that locks through the retractor
- A built-in lock-off on the car seat base
- A locking clip or other part approved by the manufacturer
Do not add a locking clip unless the manual calls for one and explains where it goes. A locking clip placed in the wrong location can create a new problem.
The vehicle manual may explain how the belt locks in child restraint mode. The car seat manual may give a different method. Follow the method that both manuals permit. If the instructions conflict, contact the car seat manufacturer before driving with the child.

How to Install an Infant Car Seat Base With Lower Anchors
Use this method only when the vehicle and base allow lower-anchor installation at that seating position.
1. Place the base rear-facing
Set the base flat on the vehicle seat with the infant carrier facing the rear of the vehicle. Do not turn the base around. An infant car seat is designed to protect a young child while rear-facing.
Center the base within the approved seating area. Keep the base away from a raised edge or steep seat contour unless the manual allows that position.
2. Set the recline angle
Adjust the recline foot, indicator, or angle position. The correct setting depends on the vehicle seat slope and the baby’s age or size.
Use the angle indicator as directed. It may need to show a line within a marked zone, a bubble in a window, or a specific color. The base may need a different setting for a newborn than for an older infant.
The recline indicator must be checked after the base is tightened. Tightening can change the angle.
3. Route the lower-anchor strap
Pull the lower-anchor strap across the approved belt path. Keep the strap flat. Do not route it over the top of the base or through a path intended for the vehicle seat belt.
Make sure the strap is not caught under the base, twisted around another part, or trapped beneath the recline foot.
4. Attach both connectors
Attach one connector to each lower anchor. Listen or feel for the connection. Tug each connector to confirm that it is attached to the vehicle anchor.
Some connectors face a specific direction. Others can attach only when the hook or push button is positioned correctly. Follow the base manual rather than forcing a connector.
5. Remove slack
Press down on the base near the lower-anchor belt path. Use your body weight carefully, but do not stand on the base or use tools unless the manufacturer says to do so.
Pull the adjustment strap until the base is tight. Keep the base in the correct recline position as you tighten it. Ask another adult to hold the base if it shifts while you work.
6. Check for movement
Hold the base at the belt path with your non-dominant hand. Push and pull it from side to side and front to back.
The base should move less than 1 inch in any direction when tested at the belt path. Do not test by holding the front edge of the base or the infant carrier handle. Movement at those points can look greater even when the attachment is secure.
If the base moves more than 1 inch, remove slack, check the connector attachment, and confirm that you used the correct belt path.
How to Install an Infant Car Seat Base With a Seat Belt
Use this method when the vehicle seat belt is the approved attachment method or when the lower-anchor weight limit has been reached.
1. Place and level the base
Set the base rear-facing on the approved vehicle seat. Adjust the recline foot or angle control before routing the belt.
Check the angle indicator. The level mark must stay within the range shown in the manual after the base is tightened.
2. Route the belt through the marked path
Thread the lap portion of the seat belt through the base’s rear-facing belt path. Some bases also require the shoulder belt to pass through the path or a built-in lock-off.
Keep the belt flat. Do not place the shoulder belt behind the base unless the instructions specifically allow that route.
3. Lock the belt
Use the method listed in the manual. Common methods include:
- Engage the vehicle’s automatic locking mode.
- Thread the belt through the base’s built-in lock-off.
- Use another approved locking method described by the manufacturer.
If the base has a lock-off, open it before routing the belt if the manual says to do so. Close it only after the belt is positioned correctly.
Never rely on the vehicle’s emergency-locking function alone if the belt can still slide through the base. The base needs a method that holds the belt tight during normal use and a crash.
4. Tighten the base
Press down near the belt path and pull the belt slack out. Keep the base from shifting as you tighten the belt.
If the belt retracts slowly, feed the slack back into the retractor. If the base uses a lock-off, hold the belt tight while closing the lock-off.
Do not pull on the shoulder belt from a point far away from the base. That can leave slack near the belt path.
5. Perform the movement test
Grip the base at the belt path and test it side to side and front to back. It should move no more than 1 inch.
If it fails this test, loosen the installation and start again. Check the belt route, locking method, recline setting, and contact between the base and vehicle seat.

Attach the Infant Carrier to the Installed Base
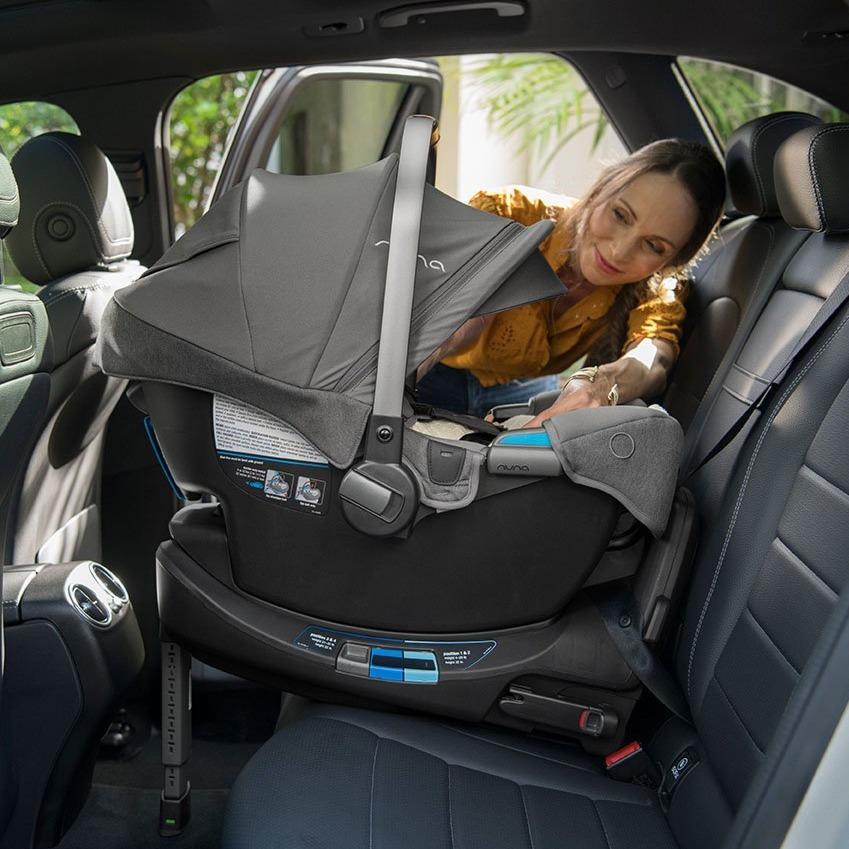
Once the base passes the movement test, attach the infant carrier.
- Confirm that the base is still level and tight.
- Place the carrier onto the base in the direction shown by the manual.
- Listen for the carrier to click into place.
- Pull up on the carrier near the handle or approved grip area to check that it is attached.
- Check the carrier’s red or green attachment indicator, if provided.
- Make sure the carrier is fully seated on both sides of the base.
Do not use the carrier if it does not click, sits unevenly, or releases during the pull test. Remove it and check for dirt, fabric, a misplaced insert, or another obstruction. If the problem remains, contact the manufacturer.
The carrier handle must be placed as the manual directs during travel. Some models allow the handle to remain upright. Others require it to move to a different position. There is no universal handle position for every infant seat.

How to Secure Your Baby in the Infant Car Seat
A tight base does not replace a properly fitted harness. Place the baby in the carrier according to the car seat instructions.
For most rear-facing infant seats:
- Keep the baby’s back and bottom flat against the seat.
- Place the harness straps at or below the baby’s shoulders.
- Buckle the harness at the chest clip and crotch buckle.
- Position the chest clip at armpit level.
- Tighten the harness until you cannot pinch slack at the shoulder.
- Keep bulky coats and blankets out from under the harness.
- Place a blanket over the buckled harness if the baby needs warmth.
The harness should lie flat and stay on the baby’s shoulders. Do not add aftermarket head supports, padding, strap covers, mirrors, or toys unless they came with the seat or the manufacturer approves them for that exact model.
Read the seat’s height and weight limits. Rear-facing use should continue until the child reaches the maximum height or weight allowed by the seat, as recommended by the American Academy of Pediatrics.
Signs the Infant Car Seat Base Is Installed Correctly
Use this final checklist before placing your baby in the vehicle:
- The base faces the rear of the vehicle.
- The base is installed in an approved seating position.
- The correct lower-anchor or seat-belt method is used.
- The attachment strap or belt is flat and tight.
- The base moves no more than 1 inch at the belt path.
- The recline indicator is in the approved range.
- The infant carrier clicks into the base.
- The carrier remains attached during a gentle pull test.
- No part of the base is cracked or loose.
- The baby’s harness is snug and correctly placed.
- The installation follows both the car seat and vehicle manuals.
A certified child passenger safety technician can inspect the setup. Use the [NHTSA child passenger safety technician search](https://www.nhtsa.gov/find- a-child-passenger-safety-technician) or check with a local hospital, fire department, police department, or community safety program. Services and appointment rules vary by location, so call before visiting.
Troubleshooting Common Infant Car Seat Base Problems
The base moves more than 1 inch
The most likely causes are slack in the belt or lower-anchor strap, a wrong belt path, or a connector that is not fully attached. Reinstall the base from the beginning.
Check whether the vehicle seat cushion is unusually soft or angled. If the manufacturer permits, use only the approved recline adjustment. Do not add towels, pool noodles, or other leveling items unless the manual specifically allows them.
The base will not sit level
Adjust the recline foot or angle position. If the indicator still fails, try an approved seating position with a different seat angle.
Do not force the base flat or wedge unapproved objects under it. Contact the manufacturer if the manual does not explain how to handle your vehicle seat shape.
The lower anchors are hard to reach
Look in the seat crease for anchor symbols or openings. The vehicle manual may show their exact location.
If the anchors sit deep in the crease, use the connector strap or tool supplied with the base if the manual includes one. Do not attach to cargo hooks, seat-frame bars, or another metal part that is not a designated lower anchor.
The seat belt keeps loosening
Confirm that the belt passes through the correct path and that the approved locking method is engaged. If the base has a lock-off, make sure the belt is tight before closing it.
If you cannot obtain a tight fit, use another approved seating position or contact the manufacturer. Do not use both lower anchors and a seat belt unless the instructions expressly permit it.
The carrier does not click into the base
Remove the carrier and inspect the attachment area. Look for fabric, crumbs, or an insert blocking the connection. Confirm that the carrier matches the base.
Do not drive with the carrier resting on the base without a clear lock. A failed attachment needs a manual check or manufacturer support.
The base touches the front seat
A rear-facing infant seat may contact the front seat in some vehicles, but the vehicle and car seat manuals must allow it. Never push the base against the front seat if the instructions prohibit contact.
If the front seat must move too far forward, use another seating position or another approved installation method.
When to Get Professional Help
Ask for a child passenger safety inspection when:
- You cannot get the base within the 1-inch movement limit.
- The angle indicator never reaches the approved range.
- The vehicle manual and car seat manual appear to conflict.
- The base or carrier has been in a crash.
- You are unsure whether the seat fits your vehicle.
- Your baby’s harness fit is difficult to judge.
- The base or connector is damaged.
- A recall affects the seat or base.
A technician can show you the process, but the manuals remain the final source for model-specific instructions. A technician should not tell you to ignore a manufacturer limit or use an unapproved accessory.
Frequently Asked Questions
Can I install an infant car seat base in the middle seat?
Sometimes. The vehicle and car seat manuals must both allow that position. The center seat may not have lower anchors, so you may need to use the vehicle seat belt. A secure side position is better than an insecure center installation.
Can I use LATCH and the seat belt at the same time?
Usually, no. Use one approved method unless the specific car seat manual says that both are allowed. Combining methods can change how the base behaves in a crash.
Should I use a towel under the infant car seat base?
Only if the car seat manufacturer allows it. Some manufacturers permit a tightly rolled towel or another approved method for correcting vehicle seat slope. Others do not. Never place a soft cushion or folded blanket under the base without written instructions.
How tight should an infant car seat base be?
At the belt path, the base should move no more than 1 inch from side to side or front to back. Do not judge tightness by the front edge, handle, or carrier. The movement test must be done where the belt or lower-anchor strap holds the base.
Can I install the base without the infant carrier attached?
Yes. Install and test the base first. Then attach the carrier and confirm that it locks into place. The base should remain tight when the carrier is removed and reattached.
Do infant car seat bases expire?
The base and carrier may have separate expiration dates or a shared date, depending on the manufacturer. Check the labels and manual. Replace the system when it expires, is damaged, is recalled, or has been involved in a crash that meets the manufacturer’s replacement guidance.
Final Check Before the First Ride
Install the base with either the approved lower-anchor method or the approved vehicle seat-belt method. Set the correct rear-facing angle, remove all slack, and test movement at the belt path. Then attach the carrier, check the lock, and fit your baby’s harness snugly.
If anything feels uncertain, stop and ask the manufacturer or a certified child passenger safety technician. A few extra minutes of checking can prevent a small installation error from becoming a serious safety problem.