

You can fix light clear coat peeling without repainting by removing loose film, sanding smooth, and spraying new clear coat.
Peeling clear coat is common on older cars, especially on the hood, roof, trunk, and mirrors. The repair can look good when the damage is small and the base color still looks sound. However, no clear coat repair can hide badly faded paint or severe oxidation forever. This guide explains how to fix peeling clear coat without repainting, what tools to use, when the method will fail, and how to protect the finish afterward.
Can You Fix Peeling Clear Coat Without Repainting?
Yes, you can fix peeling clear coat without repainting the whole panel. The repair involves removing all loose clear coat, smoothing the damaged edge, preparing the surface, and applying a new automotive clear coat.
This method works best when:
• The base paint is still smooth and has a good color.
• The peeling area is small or moderate.
• The paint under the clear coat is not cracked or missing.
• The panel has no major rust or deep scratches.
Clear coat is a transparent protective layer. Once it lifts, water, sunlight, and dirt can reach the color coat below. Think of it like a clear phone screen protector that has started to lift at the corner. Adding new material over the loose edge will not solve the problem. The loose film must come off first.
A DIY repair may not look perfect from every angle. A professional body shop can blend the repair more evenly, but a careful home repair can slow further damage and improve the panel’s appearance.
Why Clear Coat Peels
Understanding the cause helps you prevent the problem from returning. Clear coat usually peels because the bond between the clear layer and the base coat has weakened.
Common causes include:
• Long exposure to ultraviolet sunlight.
• Poor factory adhesion or an old low-quality refinish.
• Extreme heat and cold cycles.
• Harsh cleaners or strong solvents.
• Road salt, acid rain, and industrial fallout.
• Incorrect sanding or cleaning during an earlier repair.
• Moisture trapped under the clear coat.
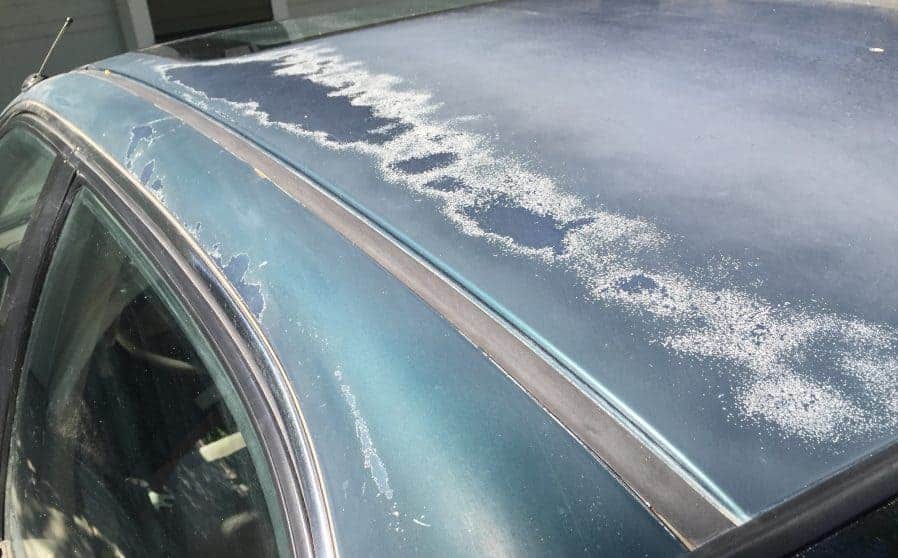
Ultraviolet light is often the main cause. Sunlight slowly breaks down the resins in clear coat. The surface may first turn dull, cloudy, or chalky. Later, small cracks form, and the clear coat begins to lift in sheets.
In my experience with exterior finish repairs, people often wait too long. They see one small bubble and assume it will stay small. Once the edge starts lifting, wind, washing, and heat can spread it quickly.
Knowing how to fix peeling clear coat without repainting also means knowing when not to attempt it. If the color coat has faded badly, the clear coat has peeled across most of the panel, or bare metal is visible, a larger refinish is usually the better choice.
Tools and Materials You Need
Good preparation matters more than expensive tools. You can repair a small area with basic supplies, but use products made for automotive finishes.
Gather the following:
• Automotive soap and clean water.
• Microfiber towels.
• Wax and grease remover.
• Painter’s tape and masking paper.
• Sandpaper in 400, 600, 800, and 1,000 to 2,000 grit.
• A sanding block or firm foam pad.
• Plastic scraper or plastic razor blade.
• Automotive clear coat spray.
• Compatible adhesion promoter, if required by the product label.
• Nitrile gloves.
• Safety glasses.
• A properly rated respirator for paint fumes.
• Tack cloth.
• Polishing compound and finishing polish.
Choose a clear coat that matches your planned use. A two-part, or 2K, clear coat often gives better durability than a basic one-part aerosol. However, 2K products contain strong chemicals and require strict safety steps. Read the label and follow its instructions.
Do not use household varnish, furniture clear, or random paint products. These may not bond to automotive paint and can turn cloudy, crack, or peel again.
Before learning how to fix peeling clear coat without repainting, check the product’s temperature range, recoat window, drying time, and required safety equipment.

Inspect the Damage Before You Start
Do not begin sanding until you know how far the damage extends. Wash the panel, dry it, and inspect it in bright light.
Run your clean hand gently over the area. Do not press hard. Look for:
• Loose or raised clear coat edges.
• Cloudy or milky sections.
• Cracks that extend beyond the visible peeling.
• Faded, chalky, or damaged base paint.
• Exposed primer or bare metal.
• Rust around chips or scratches.
Use painter’s tape to mark the repair area. Leave several inches around the visible damage so you can create a smooth transition. Clear coat damage often extends beyond what you can see at first.
You can perform a simple adhesion check on a nearby area with a small piece of masking tape. Press it down, then pull it away. If large flakes lift, the coating has poor adhesion and may need a full professional refinish.
A key lesson is to repair the entire weak area, not only the part that looks ugly. If you leave a hollow pocket or loose edge, the new clear coat may fail from underneath.

How to Fix Peeling Clear Coat Without Repainting
Follow these steps for a small repair. Work indoors or in a clean, shaded area with good airflow. Avoid windy days, direct sun, high humidity, and temperatures outside the product label’s range.
1. Wash and dry the panel
Wash the area with automotive soap. Remove road film, wax, silicone, and dirt. Dry it with a clean microfiber towel.
Do not sand a dirty panel. Small grit particles can create deep scratches that take more work to remove.
2. Remove the loose clear coat
Lift loose flakes with a plastic scraper or plastic razor blade. Keep the tool nearly flat against the surface. Use light pressure.
Do not use a metal blade. It can gouge the base paint and create a larger repair.
Continue until the remaining clear coat feels firmly attached. Tap the edge lightly with a fingernail. A hollow sound or visible movement means more material must come off.
3. Feather the damaged edge
Start with 400 or 600 grit wet-or-dry sandpaper. Wrap it around a sanding block or firm foam pad.
Sand the step between the old clear coat and the exposed paint. Your goal is to create a gradual slope, not a sharp ledge. Move the block in small crosshatch patterns and check your progress often.
You have feathered the edge correctly when you can no longer feel a sharp ridge with your fingertip. Keep the repair area as small as practical.
4. Smooth the surface
Move to 800 grit, then 1,000 or 1,500 grit, depending on the clear coat product. Wet sanding helps control dust and reduces deep scratches.
Keep the paper and surface clean. Fold the paper often so you use a fresh section. Stop sanding if you reach primer or bare metal outside the original damaged area.
5. Clean and mask the panel
Rinse away sanding residue and dry the panel completely. Wipe it with wax and grease remover using one cloth to apply it and another clean cloth to wipe it dry.
Mask nearby trim, glass, tires, door gaps, and body lines. Extend the masking far enough to catch overspray. Do not mask right along the repair edge if you plan to blend the clear coat.
6. Apply an adhesion promoter if needed
Some products require adhesion promoter on certain surfaces. Others do not. Follow the clear coat manufacturer’s instructions.
Do not add extra products simply because they seem helpful. Incompatible layers can cause wrinkling, lifting, or poor adhesion.
7. Spray the new clear coat
Shake the can for the full time stated on the label. Test the spray on cardboard first.
Hold the can about 6 to 10 inches from the panel, unless the label gives different instructions. Apply a light tack coat first. After the proper wait time, apply one or two medium coats.
Keep the can moving before you press the nozzle and continue moving after you release it. Overlap each pass by about half the spray pattern. Avoid stopping over the repair because that can create runs.
8. Blend the edge carefully
A small clear coat repair may be blended into the surrounding finish. Keep the wettest part of the spray over the repaired area and allow the outer mist to fade into the old clear coat.
Do not spray a heavy coat over the entire panel unless you are prepared to refinish the full panel. Heavy overlap can create a visible edge, solvent reaction, or uneven gloss.
9. Let the coating cure
Leave the panel alone for the time listed on the product label. Do not wash, wax, polish, or expose it to rain too soon.
Dry does not always mean fully cured. A surface may feel dry while the layers underneath remain soft.
10. Level and polish the repair
After the clear coat has fully cured, inspect the finish. If there is light texture or a small dust spot, wet sand very carefully with 1,500 to 2,000 grit.
Use a small sanding block and plenty of water. Stop as soon as the texture is reduced. Then use polishing compound and finishing polish by hand or with a low-speed machine.
This process explains how to fix peeling clear coat without repainting while limiting the repair to the damaged clear layer. It will not restore color that has already faded beneath the clear coat.

How to Make the Repair Last
A new clear coat needs protection while it cures and after it hardens. Good aftercare can slow future UV damage.
Follow these habits:
• Park in a garage or shaded area when possible.
• Wait for the full cure time before washing the vehicle.
• Use pH-balanced car shampoo.
• Avoid automatic brushes that can scratch the finish.
• Apply a quality paint sealant after the clear coat has cured.
• Use a car cover only when the vehicle is clean and the cover is soft and breathable.
• Wash bird droppings, tree sap, and bug residue as soon as possible.
• Inspect repaired panels several times each year.
Do not wax a fresh repair too soon. Solvents may still be leaving the coating, and early wax can interfere with proper curing.
Sun protection is especially important. A clear coat repair without UV protection is like putting a thin bandage on a sunburn. It may help for a while, but the cause is still present.

Common Mistakes to Avoid
Many failed repairs come from rushing the preparation stage. The spray can is rarely the main problem.
Avoid these mistakes:
• Spraying new clear coat over loose flakes.
• Sanding only the center of the peeling area.
• Using coarse sandpaper without smoothing the scratches.
• Skipping wax and grease remover.
• Spraying in direct sunlight.
• Applying one thick coat instead of several light coats.
• Mixing products from brands with different systems.
• Touching the surface with bare fingers after cleaning.
• Polishing before the clear coat has cured.
• Expecting a small blend to match a badly faded panel.
One mistake I see often is stopping when the panel looks smooth but the edge is still visible by touch. Paint may hide a slight visual defect, but clear coat highlights ridges through reflected light. Always use your fingertips as well as your eyes.
Another common error is using a household hair dryer or heat gun to speed up drying. Too much heat can trap solvent, soften the old paint, or cause the new clear coat to wrinkle.
When Clear Coat Repair Without Repainting Will Not Work
The method has limits. It is not a permanent answer for every damaged panel.
Consider professional paint repair when:
• The base color is faded or chalky.
• The paint is cracked, blistered, or peeling under the clear coat.
• Bare metal or rust is visible.
• More than half of the panel has lost its clear coat.
• The damage reaches several body panels.
• The old finish has poor adhesion across a wide area.
• You need an exact finish for a newer or valuable vehicle.
If the base paint is damaged, new clear coat cannot replace it. Clear coat is transparent, so it cannot restore missing color or hide primer. Applying clear over unstable paint may make the panel look better for a short time but will not fix the underlying failure.
A professional may sand the panel, repair the substrate, apply matching base coat, blend the color, and clear the entire panel. This is technically a repaint of the affected panel, but it usually produces a more durable and uniform result than a small DIY spot repair.
Cost, Time, and Finish Expectations
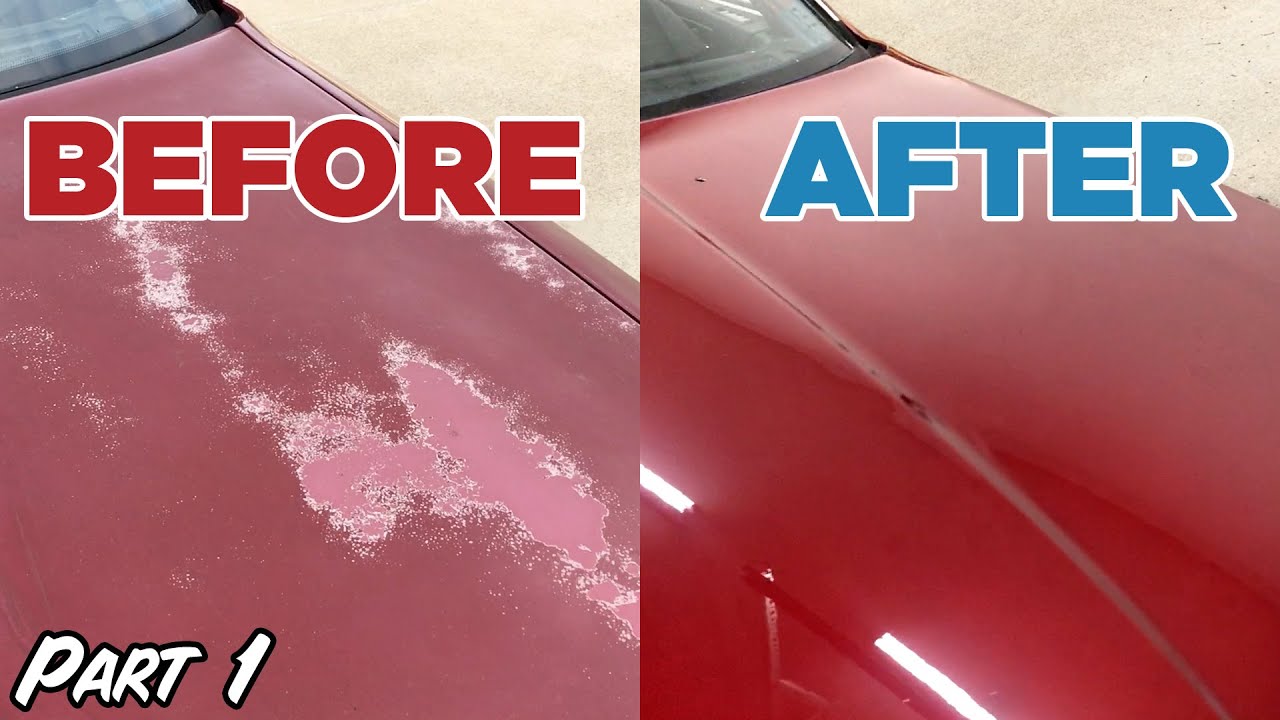
A small DIY clear coat repair may cost about $30 to $100, depending on the sandpaper, masking supplies, and type of clear coat. A professional panel repair can cost several hundred dollars or more, especially when color blending or bodywork is needed.
A basic repair may take several hours of hands-on work. The full process can take one to several days because the coating needs time to cure before sanding or polishing.
Your final result depends on:
• The size of the repair.
• The condition of the original paint.
• The quality of surface preparation.
• The spray pattern and product quality.
• Temperature and humidity.
• Your ability to blend the clear coat.
The best realistic goal is not always an invisible repair. A sound, smooth, well-sealed repair that slows further damage can be a worthwhile result. On a daily driver, that may be all you need. On a show car, a full panel refinish is usually more suitable.
Safety Tips for Automotive Clear Coat
Automotive clear coat can release harmful vapors and fine particles. Treat it as a professional coating, not as ordinary craft paint.
Use these safety steps:
• Read the safety label and technical sheet.
• Wear chemical-resistant gloves and eye protection.
• Use a respirator rated for organic vapors and particulates.
• Spray only where there is strong airflow that carries fumes away from people.
• Keep the product away from flames, sparks, cigarettes, and heaters.
• Do not spray in an attached garage with the door closed.
• Keep children and pets away from the work area.
• Dispose of used rags and empty cans according to local rules.
Two-part clear coat products can contain isocyanates, which are especially hazardous when inhaled. A basic dust mask is not enough protection. If you cannot provide the right ventilation and respirator, use a professional body shop instead.
Safety is part of learning how to fix peeling clear coat without repainting. A good-looking panel is never worth risking your lungs or your home.
Frequently Asked Questions About How to Fix Peeling Clear Coat Without Repainting
Can I spray clear coat over peeling clear coat?
No. New clear coat will not bond reliably to loose or lifting material. Remove all unstable clear coat first, then feather the edges and clean the surface.
Will polishing stop clear coat from peeling?
No. Polishing can improve dull clear coat that is still firmly attached, but it cannot repair peeling. Once the layer lifts, sanding and recoating are needed.
Can I fix peeling clear coat with a touch-up pen?
A touch-up pen may cover a tiny chip, but it is not ideal for broad peeling. It often leaves a visible ridge and may not provide enough UV protection for a large area.
How long does a DIY clear coat repair last?
A careful repair may last for years if the base paint is stable and the new clear coat is applied correctly. Its life depends on sun exposure, product quality, preparation, and aftercare.
Can I repair clear coat peeling on plastic trim?
Yes, but plastic needs proper cleaning and sometimes an adhesion promoter. Always use a clear coat designed or approved for automotive plastic surfaces.
Should I wet sand peeling clear coat?
Wet sanding is useful after loose material is removed because it reduces dust and helps smooth the edge. Do not flood unfinished seams or allow water to remain under trim and moldings.
Can I fix clear coat peeling in winter?
Only if the work area meets the product’s temperature and humidity requirements. Cold or damp conditions can cause slow curing, cloudiness, poor adhesion, and surface defects.
Conclusion
Learning how to fix peeling clear coat without repainting starts with honest inspection. Remove every loose section, feather the edge, clean the surface, apply compatible clear coat in light coats, and allow enough curing time before polishing.
This repair works best when the original color coat is still healthy. If the paint is faded, cracked, or missing, a professional panel refinish will give you a stronger and more consistent result. Start with a small, hidden area if you are unsure, follow the product label, and protect the finished panel from sunlight. Share your repair experience or explore more vehicle detailing guides to keep your car looking its best.