

Installing car seat covers is usually a simple job, but the wrong fit or placement can affect seat belts, airbags, controls, and child-seat safety. In the United States, always check your vehicle owner’s manual and the cover maker’s instructions before you begin. Choose covers made for your vehicle, keep airbag areas clear, and never cover a seat belt buckle or restraint path.
This guide explains how to install front-seat covers, rear-seat covers, bench covers, and split-seat covers. It also covers common problems, cleaning, and special safety rules for vehicles with side airbags or child safety seats.

Before You Install Car Seat Covers
Gather the covers, the installation straps or hooks, a trim tool if supplied, and your vehicle and cover instructions. You may also need a flashlight, a clean cloth, and a small plastic tool for tucking fabric. Do not use sharp tools that could cut wiring or upholstery.
Park on a level surface, turn off the vehicle, and set the parking brake. Move the seats to a position that gives you room to work. If you disconnect a power seat or remove a seat, follow the vehicle manual carefully. Many seats contain wiring for airbags, occupancy sensors, seat heaters, or power controls.
Check the cover for vehicle compatibility
Before fitting the cover, confirm that it matches:
- Your vehicle’s make, model, and model year
- The number of seat sections
- Headrest shape and size
- Seat belt locations
- Armrests and center consoles
- Power-seat controls
- Heated or ventilated seat functions
- Side-impact airbag locations
A cover labeled “universal” may fit many vehicles, but it may not fit every seat safely. A custom or vehicle-specific cover often has openings for headrests, buckles, armrests, and airbags.
Find the side-airbag label
Look along the outer side of each front seat back. A label may say “SRS Airbag,” “Side Airbag,” or show an airbag symbol. This area must remain clear unless the cover maker specifically states that the cover is designed and tested for that airbag location.
NHTSA warns that seat covers and other accessories must not interfere with vehicle safety systems. If the cover has no clear airbag design or instruction, do not install it over a front seat with a side airbag.
How to Install Front Car Seat Covers
Install the seat back cover first, then the seat cushion cover. This order gives you better access to the gaps and keeps the fabric from bunching.
1. Remove the front headrest if the cover requires it
Many front-seat covers have holes or openings for headrest posts. Press the headrest release button and lift the headrest out if the vehicle manual allows removal.
Some headrests do not come out easily. Do not force them. If the cover requires removal and the headrest will not release, use the cover maker’s method or ask a professional installer for help.
Set the headrest aside in a clean place. Keep track of its direction and position.
2. Identify the front and back of the seat-back cover
Look for labels, seams, openings, or airbag markings. The side-airbag seam should face the outside edge of the seat, not the center console. Do not turn the cover around to make it fit.
Slide the cover over the top of the seat back. Pull it down evenly on both sides. Keep the seams straight and make sure the cover does not twist.
3. Align the airbag opening
If the cover includes a special side-airbag seam, align it with the vehicle’s airbag area. The seam should remain flat and unobstructed. Do not tuck, sew, tape, or pin this section closed.
Stop if the cover covers the airbag label, creates heavy folds over the airbag area, or pulls tightly across the seam. A poor fit can change how the cover tears during airbag deployment.
4. Tuck the lower flap into the seat gap
Many seat-back covers have a lower flap that passes between the seat back and the seat cushion. Push the flap through the gap with your hand or the supplied plastic tool.
Keep clear of wires, seat tracks, and metal parts. Do not pull hard on wiring or force the flap into a narrow space. If the cover has straps, route them as shown in the instructions. Do not place straps across a seat belt or under a moving seat track.
5. Install the front seat cushion cover
Place the cushion cover over the seat from front to back. Line up the seams with the edges of the cushion. Smooth the fabric toward the sides and rear of the seat.
Feed the rear flap through the gap between the cushion and seat back. Attach the hooks, straps, or elastic under the seat only where the instructions show. Keep all fasteners away from:
- Seat belt anchors
- Airbag wiring
- Occupant sensors
- Seat tracks
- Power-seat motors
- Seat-heater wiring
Do not attach a hook to a wire, cable, spring, or moving mechanism.
6. Reinstall the headrest
Push the headrest posts into the correct holes until the headrest locks. Pull up gently to check that it is secure. Confirm that the cover does not stop the headrest from moving or locking.
A headrest must remain at the proper height and position. Do not leave it removed while driving.
7. Check the seat controls
Move the seat forward, backward, up, and down if it has power controls. Recline the seat and return it to its normal position. Watch the cover and straps as the seat moves.
The cover must not catch on the seat track, block a lever, pull on a wire, or stop the seat from locking. Test heated or ventilated seats only after checking the cover instructions. Some covers can reduce heat transfer or block ventilation.

How to Install Rear Car Seat Covers
Rear seats come in several designs. You may have a one-piece bench, a 60/40 split bench, separate bucket seats, or seats that fold forward. The cover must match the way the seat moves.
Install a one-piece rear bench cover
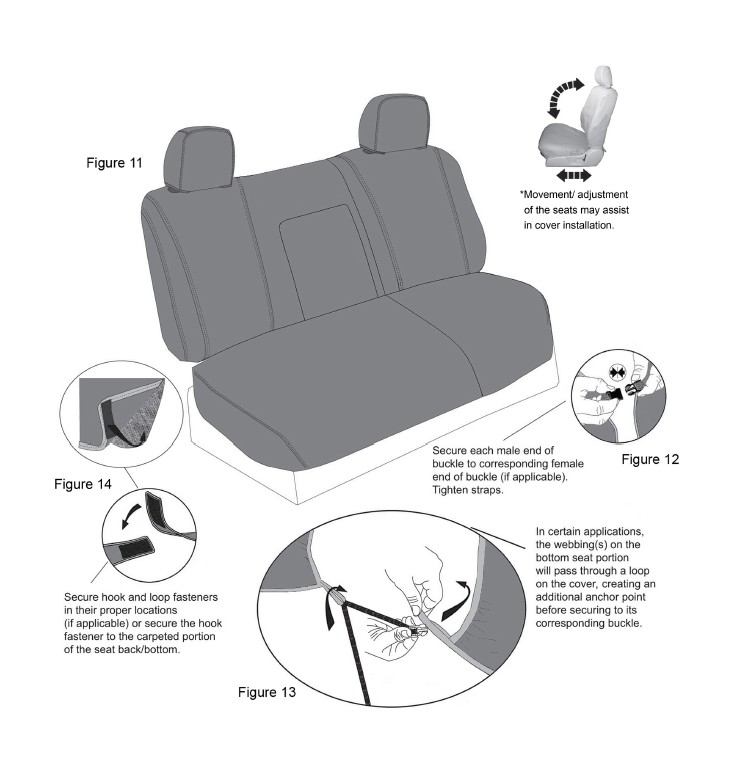
Start by lifting the lower cushion if the vehicle design permits it. Some lower cushions fold upward; others have release tabs or bolts. Check the vehicle manual before removing anything.
Place the seat-back cover over the rear seat back. Align openings for:
- Rear headrests
- Shoulder belts
- Center armrests
- Top tether anchors
- Center seat belt hardware
Feed the lower flap through the seat gap. Attach straps under the cushion without covering anchors or wiring.
Next, fit the lower cushion cover. Keep all buckles and belt receivers exposed. A passenger should be able to find and use each buckle without moving the cover.
Install covers on a 60/40 split rear seat
Treat each section as its own seat. Do not stretch one large cover across a split that needs to fold independently.
Fold each seat section as the vehicle manual describes. Check that the cover does not bridge the hinge or block the release handle. If the seat folds, fold it several times after installation to make sure the cover stays attached and does not pull loose.
Leave the center seat belt path open. If the belt comes from the roof, seat back, or cushion, the cover must not rub against or trap the belt.
Keep child-seat anchors accessible
LATCH, or Lower Anchors and Tethers for Children, consists of lower anchors and top tether anchors used with some child restraints. The anchors must remain easy to reach and free from thick cover material.
Some vehicle-specific covers include marked openings for LATCH anchors. If the cover hides an anchor, do not cut an opening unless the cover maker provides exact instructions. An incorrect cut can weaken the cover or leave loose fabric near the child restraint.
How to Install Car Seat Covers Around a Child Safety Seat
Install the vehicle cover before installing the child restraint. Then follow the child-seat manual and the vehicle manual for the correct seating position.
Do not place a thick, loose, or unapproved cover under a child safety seat. Extra material can change how tightly the restraint sits on the vehicle seat. The National Highway Traffic Safety Administration recommends using only items approved by the child restraint manufacturer under or around a child seat.
A thin protector may be allowed by some child-seat makers, but approval varies. Check the exact child-seat model instructions. Do not assume that a product is safe because it is sold as a “car seat mat” or “seat protector.”
After installing the child restraint, check these points:
- The seat sits flat on the vehicle cushion.
- The lower anchors or seat belt follow the child-seat instructions.
- The restraint does not rest on a buckle or raised seam.
- The seat does not slide because of loose cover material.
- The top tether is attached when required.
- The restraint moves no more than 1 inch side to side or front to back when tested at the belt path, following NHTSA guidance.
- The child restraint manual allows the cover or protector.
If the cover causes the child seat to move more than allowed, remove the cover from under the restraint. Never solve a loose installation by adding more padding.
How to Tell Whether the Installation Is Correct
A properly installed cover looks smooth, stays in place, and does not interfere with the vehicle. Sit in each seat and check the basic functions before driving.
Use this inspection list:
- The cover fits the seat shape without large folds.
- Airbag seams and labels are not blocked.
- Seat belts pull out and retract freely.
- Buckles are visible and easy to use.
- Headrests lock at the correct height.
- Rear seats fold and latch as designed.
- Armrests and center consoles open normally.
- Power-seat controls work through their full range.
- No strap touches wiring or a seat track.
- No cover edge blocks a LATCH or top tether anchor.
- There is no loose fabric near pedals or the driver’s controls.
Take a short, low-speed check in a safe area. Listen for rubbing, snapping, or pulling sounds when the seats move. Recheck the covers after the first drive because elastic and straps may settle.

Common Car Seat Cover Installation Problems
Most installation problems come from choosing the wrong cover or routing the fasteners incorrectly. Fix the cause rather than stretching the cover harder.
The cover is too tight
A tight cover may be the wrong size, installed on the wrong seat, or routed in the wrong direction. Remove it and compare the cover shape with the seat. Check whether the seat has a wider cushion, fixed headrest, armrest, or unusual side bolster.
Do not cut the cover to make it fit unless the manufacturer gives written cutting instructions. Cutting may remove an airbag seam or weaken a restraint point.
The cover keeps sliding
Sliding often means the cover is not tucked into the seat gap or the straps are not attached to the correct points. Remove the cushion cover, smooth it from the center outward, and refit it.
Do not add household cords, metal wire, zip ties, or sharp hooks. These can damage upholstery, interfere with sensors, or become hazards in a crash.
The seat belt buckle is covered
Remove the cover and reposition it. The buckle must stand above the cover and remain easy to reach. Do not cut around a buckle unless the cover is designed for that exact location.
A covered buckle can delay use and may cause someone to route the belt incorrectly.
The airbag seam is in the wrong place
Stop using the cover on that seat. A seam on the wrong side may not open as intended. Contact the cover maker or choose a cover specifically labeled for side-airbag-equipped seats.
Do not rely on a general statement such as “airbag compatible” without checking the product instructions for your vehicle and seat design.
The seat heater works poorly
A cover can reduce heat transfer, especially if it is thick or padded. Some materials may also block ventilation in cooled seats. Follow the vehicle and cover instructions. Do not use a cover that the manufacturer excludes for heated or ventilated seats.
If the seat becomes unusually hot, smells of burning, or shows a warning light, turn the system off and have the vehicle checked.
The cover triggers a warning light
An airbag or restraint warning light may indicate a problem with a sensor, connector, or wiring. Remove the cover if its straps or fabric are near the wiring, but do not unplug seat connectors unless the vehicle manual gives a safe procedure.
If the warning light stays on, have the vehicle inspected by a qualified technician. Do not ignore a supplemental restraint system warning.

How to Clean and Maintain Car Seat Covers
Clean the covers according to their care label. Remove them before washing if the instructions require it. Do not use bleach, heat, or harsh cleaners unless the maker allows them.
Inspect the covers during cleaning. Look for stretched elastic, loose hooks, torn seams, and damaged airbag panels. Replace a cover that no longer stays secure or has damage near a side-airbag seam.
Remove the covers before servicing seat wiring or removing a vehicle seat. After reinstalling the seat, confirm that all bolts, connectors, and warning systems work as described in the vehicle manual.
What to Do If Your Car Seat Covers Do Not Fit
Do not force an ill-fitting cover into place. First, confirm that the cover matches the exact vehicle, seat row, and seat configuration. Then check whether the headrest, armrest, split seat, or side airbag changes the fit.
If the cover still does not fit, return or exchange it. Ask the maker whether a vehicle-specific version exists. A professional auto-upholstery installer may help with fit, but professional installation does not make an unsafe cover safe for an airbag or child restraint.
For a warning light, damaged wiring, blocked airbag area, or uncertain child-seat installation, consult a qualified technician or a certified Child Passenger Safety Technician. In the United States, parents and caregivers can find inspection resources through NHTSA’s child passenger safety information.

Frequently Asked Questions
Can I install car seat covers without removing the seats?
Yes. Most covers install without removing the vehicle seats. You may need to remove the headrests or lift a rear cushion, but follow the vehicle manual. Never remove a seat or disconnect wiring unless you understand the required safety steps.
Are universal car seat covers safe?
They can be safe when they fit correctly and are designed for the vehicle’s seat and airbag system. A universal cover is not automatically safe for every vehicle. Check the side-airbag design, seat belt openings, headrest fit, and instructions.
Can I use seat covers with side airbags?
Use only covers that the manufacturer identifies as compatible with side airbags in that seat position. The cover must have the correct tear seam and must not block the airbag area. When in doubt, do not install it.
Can I put a seat cover under a child car seat?
Only if the child restraint manufacturer allows that specific cover or protector. Extra padding or loose fabric can change the child seat’s installation. Check both the child-seat manual and the vehicle manual.
Should car seat covers cover the seat belt buckles?
No. Buckles must remain visible, reachable, and fully usable. A cover that hides or traps a buckle is not installed correctly.
Conclusion
The safest way to install car seat covers is to match the cover to the vehicle, follow the supplied instructions, and check every safety system after fitting. Keep side-airbag areas, seat belts, buckles, LATCH anchors, seat tracks, and wiring clear.
After installation, move the seats, test the belts, fold the rear seats, and inspect the cover for movement. If the cover does not fit without force or blocks a safety feature, remove it and choose a better-matched design.