

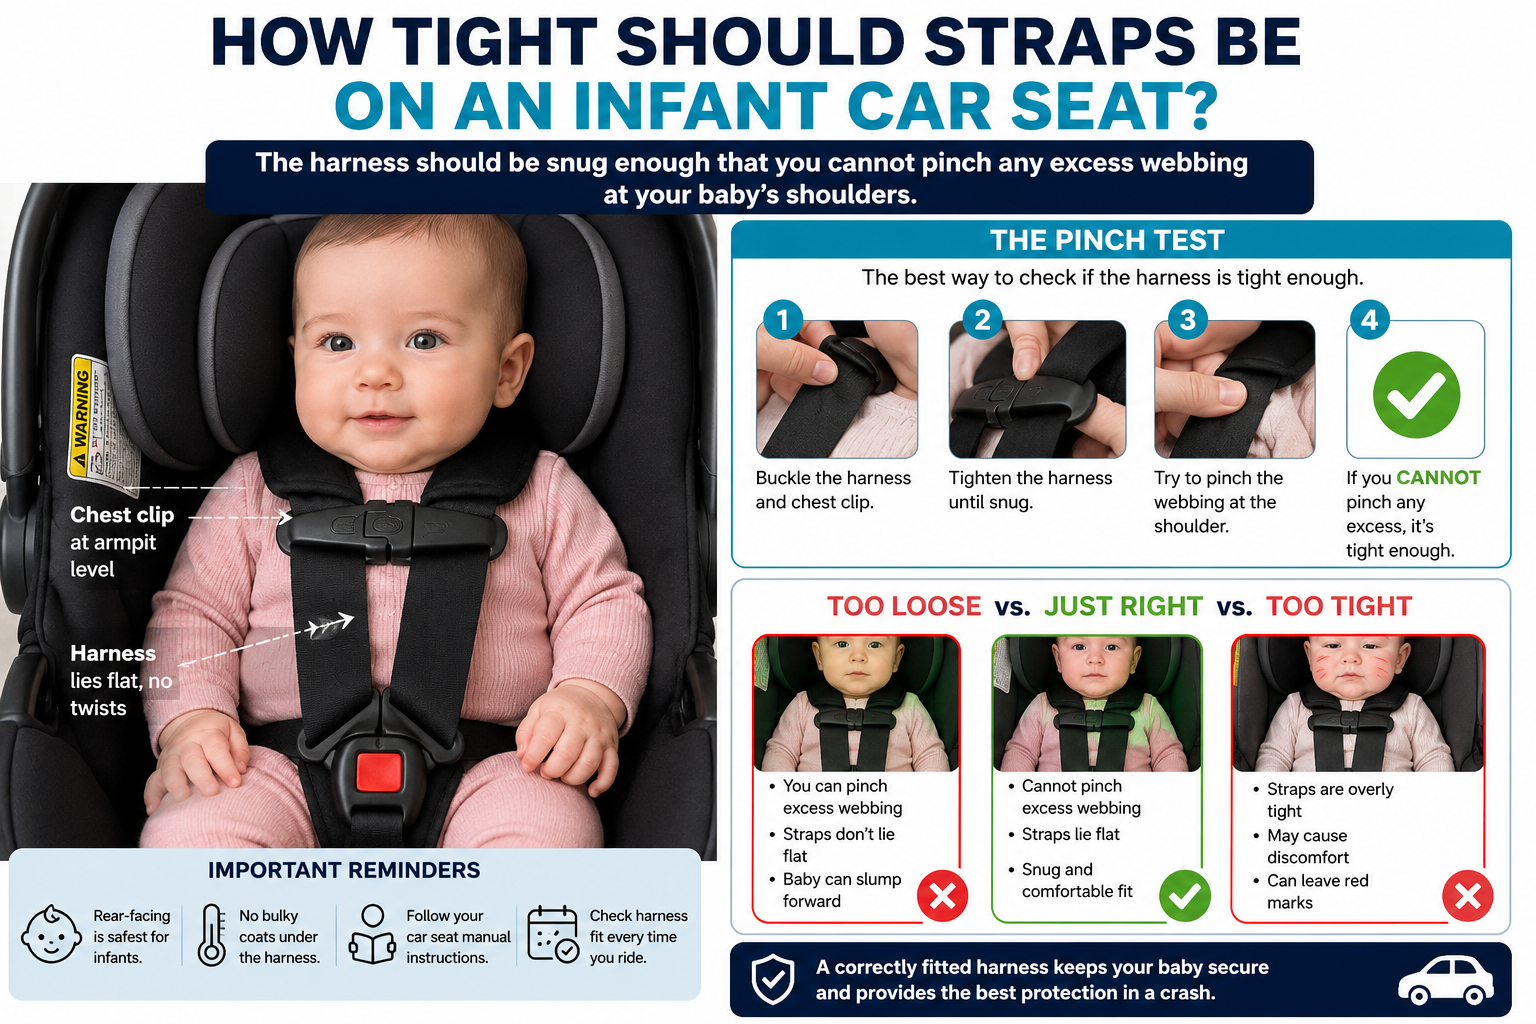
On a rear-facing infant car seat, the shoulder straps should come through the harness slots at or below your baby’s shoulders. The straps should lie flat, feel snug, and connect at the chest clip at armpit level.
This rule applies to most infant car seats used in the United States. Still, the car seat manual always comes first because slot names, insert use, and harness design can differ by model.
For a forward-facing seat, the rule changes: the harness straps usually need to come through slots at or above the child’s shoulders. Never change the strap position based only on appearance. Check the manual for your exact seat.

The correct shoulder strap position for a rear-facing infant car seat
The shoulder straps should come from slots at or just below the baby’s shoulders when the child rides rear-facing.
Look at your baby from the side. The harness should leave the seat near shoulder height or slightly lower. The straps should not angle sharply upward from the baby’s shoulders to the slots.
This position helps the harness hold the baby in the safest part of the seat during a sudden stop. The harness works as one system with the shell, crotch buckle, chest clip, and vehicle installation. A strap that is too high or too low can change how that system holds the child.
What “at or below the shoulders” means
The harness slot does not need to line up perfectly with the top of the shoulder. A slot may be slightly below the shoulder and still be correct for rear-facing use.
Use these checks:
- The strap comes from a slot level with or below the shoulder.
- The strap does not rise from the shoulder toward the slot.
- The webbing lies flat, without twists.
- Both straps use the same height.
- The harness is snug against the child’s body.
- The chest clip rests at armpit level.
Do not place bulky clothing under the harness. A thick coat can compress in a crash and leave the harness too loose. Put the child in thin layers, buckle the harness, and use a blanket over the straps if needed.

When should infant car seat straps move up?
Move the harness straps to the next slot when your baby’s shoulders reach the current slot height or when the manual says the next position is needed.
Do not move the straps up just because the baby looks crowded. A small infant may look low in the seat while the harness position is still correct. Check the actual shoulder-to-slot relationship and the car seat instructions.
Many infant car seats use an adjustable headrest and harness system. On these models, moving the headrest may also move the harness. Other seats require you to remove and rethread the straps. Follow the manufacturer’s method.
Signs that the current slot is too low
The harness may need adjustment when:
- Your baby’s shoulders are clearly above the harness slot.
- The straps pull down sharply from the shoulders.
- The manual gives a different height limit for the current setting.
- The harness no longer rests smoothly on the shoulders.
- The seat’s built-in adjustment system indicates a new position.
Do not use a slot that the manufacturer says is not allowed for rear-facing use. Some seats have slots that work only in one direction, or they may have different rules for newborn inserts and head supports.
When to remove the infant insert
A newborn insert may change how the baby sits in the seat. Remove it only when the manual allows it. Never add an aftermarket insert, strap cover, cushion, or head support unless the car seat maker approved it for that model.
A replacement or extra insert can push the baby forward, change harness fit, or affect the angle of the body. “Universal” does not mean safe or approved for every seat.

How to adjust shoulder straps on an infant car seat
Use this process each time you adjust the seat. Keep the car seat on a firm surface, and read the manual before removing any harness parts.
1. Check the seat direction
Confirm that the seat is installed rear-facing. An infant car seat should stay rear-facing until the child reaches the seat’s height or weight limit.
Rear-facing seats need harness straps at or below the shoulders. If you are using a convertible car seat forward-facing later, check the manual because the strap position changes.
2. Remove the baby if needed
Do not adjust a harness around a moving baby. Place the baby in a safe area while you change the slot or harness height.
3. Find the approved harness positions
Look for the shoulder slots, adjustable headrest, or harness height mechanism. The manual may show a diagram for:
- Rear-facing harness slots
- Forward-facing harness slots
- Newborn insert use
- Harness rethreading
- Headrest adjustment
- Approved recline positions
If the printed manual is missing, find the manual on the manufacturer’s official website. Use the exact model name and model number.
4. Set both straps to the same height
Both shoulder straps should come from matching slots. Do not place one strap higher than the other.
If you rethread the harness, make sure the webbing follows the original path. Check the back of the seat to confirm that the strap is connected correctly to the splitter plate or approved attachment point.
5. Place the baby in the seat
Set the baby’s back and bottom flat against the seat. The baby should not be slouched or sitting on a blanket.
Make sure the head is within the approved headrest and body-position limits. A newborn may need the seat reclined according to the manual.
6. Buckle the harness
Insert the buckle tongues fully into the buckle. Then connect the chest clip.
The chest clip should sit at armpit level, across the center of the chest. It should not rest on the neck or stomach.
7. Tighten the harness
Pull the harness adjustment strap until the webbing lies snug against the baby.
Use the pinch test:
- Pinch the harness webbing at the collarbone.
- Try to pinch it between your thumb and finger.
- If you can gather extra webbing, tighten the harness.
Do not perform the pinch test on the padded chest clip. Test the strap near the shoulder.
8. Check the final fit
The harness should pass these checks:
- The straps lie flat.
- The straps are not twisted.
- The straps are snug.
- The chest clip is at armpit height.
- The buckle is fully closed.
- The baby’s back and bottom remain against the seat.
- No thick clothing sits under the harness.
If the straps loosen after adjustment, stop and find the cause before driving.
Shoulder straps, chest clip, and crotch buckle: what is the difference?
The shoulder straps are only one part of the restraint system. Each part has a separate job.
| Car seat part | Correct position or function |
|---|---|
| Shoulder straps | At or below the shoulders for rear-facing use |
| Chest clip | At armpit level, centered on the chest |
| Crotch buckle | Between the baby’s legs and secured in the position allowed by the manual |
| Harness webbing | Flat, untwisted, and snug |
| Seat recline | Set to the angle shown by the manufacturer |
| Newborn insert | Used only when approved for that seat and child size |
The chest clip does not replace a tight harness. It helps keep the shoulder straps positioned on the child’s shoulders. The harness, not the chest clip, holds the child in the seat.
Do not place the chest clip near the baby’s neck. Do not lower it to the belly. A clip in the wrong place can affect the fit and may cause injury in a crash.

Rear-facing versus forward-facing strap height
The correct harness slot depends on the direction of travel.
| Seat direction | Typical harness position |
|---|---|
| Rear-facing | At or below the child’s shoulders |
| Forward-facing | At or above the child’s shoulders |
These are common U.S. harness-fit rules, but the exact car seat manual controls. Some designs use a moving headrest, while others use fixed slots. Some seats also limit which slots are allowed in each mode.
Do not turn a child forward-facing just because the shoulders reach the top rear-facing slot. First check the seat’s rear-facing height and weight limits. The American Academy of Pediatrics recommends keeping children rear-facing as long as possible, within the limits of the car seat.
When a child changes to forward-facing, recheck all of the following:
- Harness slot height
- Top harness weight
- Child height limit
- Seat recline setting
- Top tether use
- Vehicle installation method
Forward-facing children generally need the top tether used according to the car seat and vehicle instructions. The tether is separate from the shoulder straps, but it is an important part of the forward-facing installation.
Common mistakes with infant car seat shoulder straps
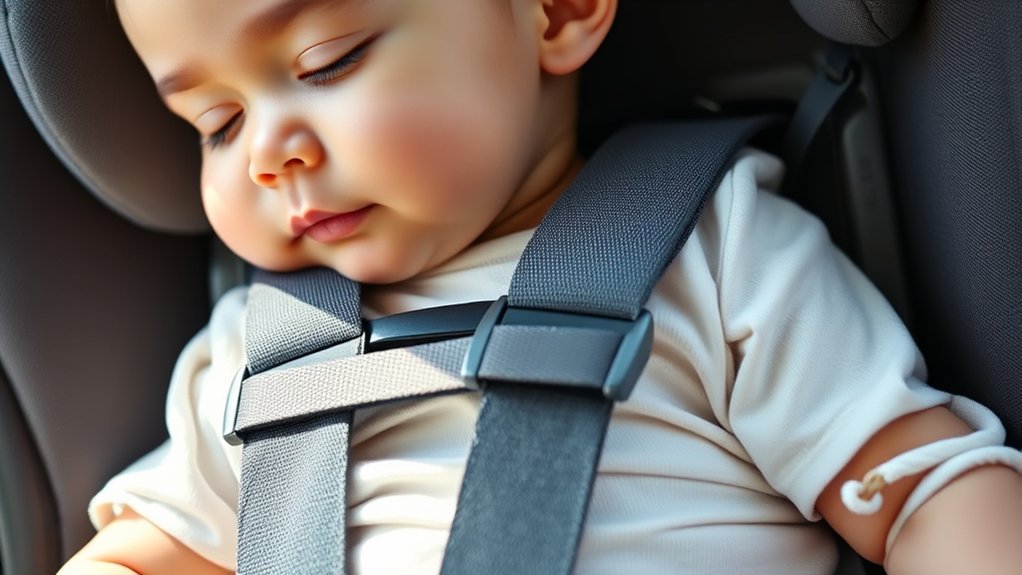
Most harness problems come from a small setup error. Check these issues before changing the seat.
The straps are above the baby’s shoulders
This is usually incorrect for rear-facing use. Move the harness to an approved slot at or below the shoulders, if the manual permits it.The straps are too loose
A loose harness can leave space between the webbing and the child. Tighten the harness until you cannot pinch excess webbing at the collarbone.
Check for hidden causes, such as:
- A twisted strap
- A coat under the harness
- A child sitting on a blanket
- A buckle tongue that is not fully inserted
- A harness adjuster that is blocked
- A harness routed incorrectly after rethreading
The chest clip is too low
Move the chest clip to armpit level. It should sit across the middle of the chest, not on the belly.
The straps are twisted
Untwist the webbing from the seat slot to the buckle. A twisted strap does not lie flat and may not distribute force as designed.
The baby is wearing a thick coat
Remove the coat before buckling the harness. After tightening the straps, place a blanket over the child if needed. Keep the blanket below the chest clip and away from the face.
An extra cushion or strap cover was added
Remove any accessory that did not come with the seat unless the manufacturer specifically approves it for that model. Added padding can change the harness fit.
The baby’s head slumps forward
Head slumping may mean the seat angle is wrong, the baby’s position needs correction, or the child is not well supported within the approved insert system. Check the recline indicator and manual.
Do not add loose supports. If the baby’s airway looks blocked, stop using the setup until you can correct it. Contact the manufacturer or a certified child passenger safety technician for help.

How tight should infant car seat shoulder straps be?
The straps should be snug enough that you cannot pinch a fold of webbing at the collarbone.
They should not cause deep marks, but light temporary marks can occur with a properly snug harness. A baby should not be able to pull the straps off the shoulders or move the chest clip down.
A good fit has four parts:
- The baby sits with the back and bottom against the seat.
- The straps come from the correct slots.
- The webbing lies flat and snug.
- The chest clip rests at armpit height.
Avoid tightening only one side. Pull the central harness adjuster in small movements, then check both shoulders. If one side stays loose, inspect the buckle tongues and strap path.

What to do if the shoulder straps do not seem to fit
If the correct slot appears too low or too high, stop and inspect the setup rather than forcing the harness.
Use this troubleshooting order:
- Read the manual. Confirm the allowed slot for rear-facing use.
- Check the child’s position. Make sure the bottom and back are flat against the seat.
- Check the insert. Confirm that it is approved and still allowed for the child’s size.
- Check the recline angle. Use the seat’s indicator or instructions.
- Check for added padding. Remove unapproved items.
- Inspect the harness path. Look for twists or incorrect rethreading.
- Call the manufacturer. Provide the exact model and date of manufacture.
- Visit a certified child passenger safety technician.
A technician can check both the harness fit and the vehicle installation. In the United States, parents can search for assistance through the National Highway Traffic Safety Administration’s child passenger safety resources or a local inspection station.
Do not use a seat with damaged webbing, a broken buckle, missing parts, or an unknown crash history. Contact the manufacturer about replacement parts. Do not repair the harness with tape, sewing, glue, or hardware from another seat.

How to confirm the seat is installed correctly
Correct shoulder strap height does not guarantee that the car seat is installed correctly.
After fitting the baby, check the installation:
- The seat follows the vehicle and car seat instructions.
- The correct belt path or lower-anchor path is used.
- The seat is at the required recline angle.
- The seat does not move more than about 1 inch from side to side or front to back when tested at the belt path.
- The lower anchors are used only within the limits listed by the manufacturer.
- The vehicle seat belt is locked when required.
- The handle position follows the infant seat manual.
- The seat is not placed in front of an active frontal air bag.
The 1-inch movement check applies at the belt path, not at the top of the seat. A seat may move slightly at the top while remaining tight at the belt path.
For a new installation, a certified child passenger safety technician can provide hands-on help. A technician’s check is especially useful after a crash, after switching vehicles, or when using a convertible seat for the first time.

What the main U.S. safety organizations recommend
The guidance in this article follows the general direction of major U.S. child passenger safety organizations:
- The National Highway Traffic Safety Administration advises parents to keep children rear-facing as long as possible within the car seat’s limits and to follow the seat and vehicle manuals.
- The American Academy of Pediatrics recommends rear-facing travel for as long as possible, within the height and weight limits of the seat.
- Safe Kids Worldwide provides child passenger safety education and connects families with inspection resources.
- The manufacturer’s manual controls the exact harness slots, insert rules, recline positions, and installation steps for a specific model.
Useful starting points include:
- NHTSA: Car Seats and Booster Seats
- American Academy of Pediatrics: Car Seats and Booster Seats
- Safe Kids Worldwide: Car Seat Safety
These sources provide general U.S. guidance. They do not replace the manual for your exact car seat.

Frequently asked questions
Should infant car seat straps be above or below the shoulders?
For a rear-facing infant car seat, the straps should usually be at or below the baby’s shoulders. Follow the manual for the exact seat.
Where should the chest clip be on an infant car seat?
The chest clip should sit at armpit level, centered on the baby’s chest. It should not sit on the neck or stomach.
Can the shoulder straps be level with the baby’s shoulders?
Yes. For rear-facing use, straps at shoulder level are generally acceptable if the manual allows that slot and the straps do not angle upward from the shoulders.
When should I raise the infant car seat straps?
Raise them when the baby’s shoulders reach the current slot or when the manual directs you to use the next position. Keep the straps at or below the shoulders for rear-facing travel.
Can I use a shoulder strap positioner or extra padding?
Only if the car seat manufacturer approves that specific accessory for the exact model. Do not use generic strap positioners, cushions, or head supports.
Where can I get an infant car seat checked?
Look for a certified child passenger safety technician or a local car seat inspection event in your area. NHTSA and Safe Kids Worldwide provide U.S. resources for finding assistance.
Key takeaway
For a rear-facing infant car seat, place the shoulder straps at or below your baby’s shoulders. Keep the harness flat and snug, position the chest clip at armpit level, and follow the manual for your exact model.
If the fit still looks wrong, do not guess. Contact the manufacturer or have the seat checked by a certified child passenger safety technician.